Sessions 1:
Non-destructable editing
 |
| Original |
 |
| Proof Colours - shows what colours will be printed |
 |
| Gamut warning - shows which colours are out of the range of the printer |
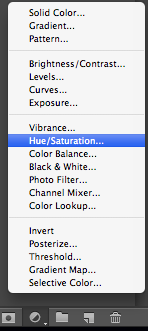 |
| Selecting hue - Bottom right hand corner |
 |
| Changing the hue to get the colours in the range |
 |
| changed hue - half the colours have been accepted, the others are not |
 |
| Red colours generally work better - change hue to red - all colour is accepted |
Changing the levels
 |
| Changing the levels for the picture to make the detail more obvious |
 |
| Changing the brush size and hardness - 0 is best |
 |
| Image with editing complete - parts of the levels mask blocked out to leave parts unaffected |
 |
| Original - aim to make statue visible |
 |
| Select the whole statue - quick select tool |
 |
| Deselect the small areas in between the statue |
 |
| Change levels - drag the shadow triangle to the left - brightens the selected area |
 |
| Photomerge - scans images and merges them together at the right points to create a panoramic image |
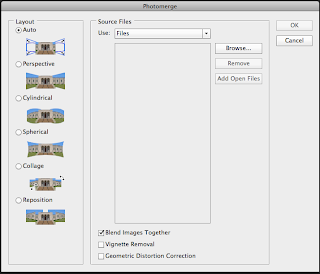 |
| Use Auto - select images - 'Blend images together' |
 |
| Image when blending is complete |
 |
| Cropped version |
Session 2:
How to merge images together to make it look like there is no people/interference in the image
 |
| Load Files into Stack |
 |
| Choosing the image files |
 |
| Image once completed - over a hundred images together |
 |
| Median - get's rid of everything that isn't consistent - the people |
 |
| Image once done |
 |
| Rasterize layer from smart layer |
 |
| Sky is too dull in the last image, so from the image collection, choose the image with the sky you want, and then 'place' - from this, get rid of everything but the sky on this image and the above happens |
How to make a contact sheet
 |
| Automate - contact sheet |
 |
| Choose files - change media size & resolution - change amount of thumbnails per page |
 |
| Final contact sheet from photographs taken |
No comments:
Post a Comment